Quickstart
Get started with the CELITECH API in minutes. This guide will walk you through obtaining your credentials, installing the SDK, and making your first eSIM purchase.
Prerequisites
Before you begin, make sure you have:
- Access to the CELITECH Dashboard
- Your preferred programming language environment set up
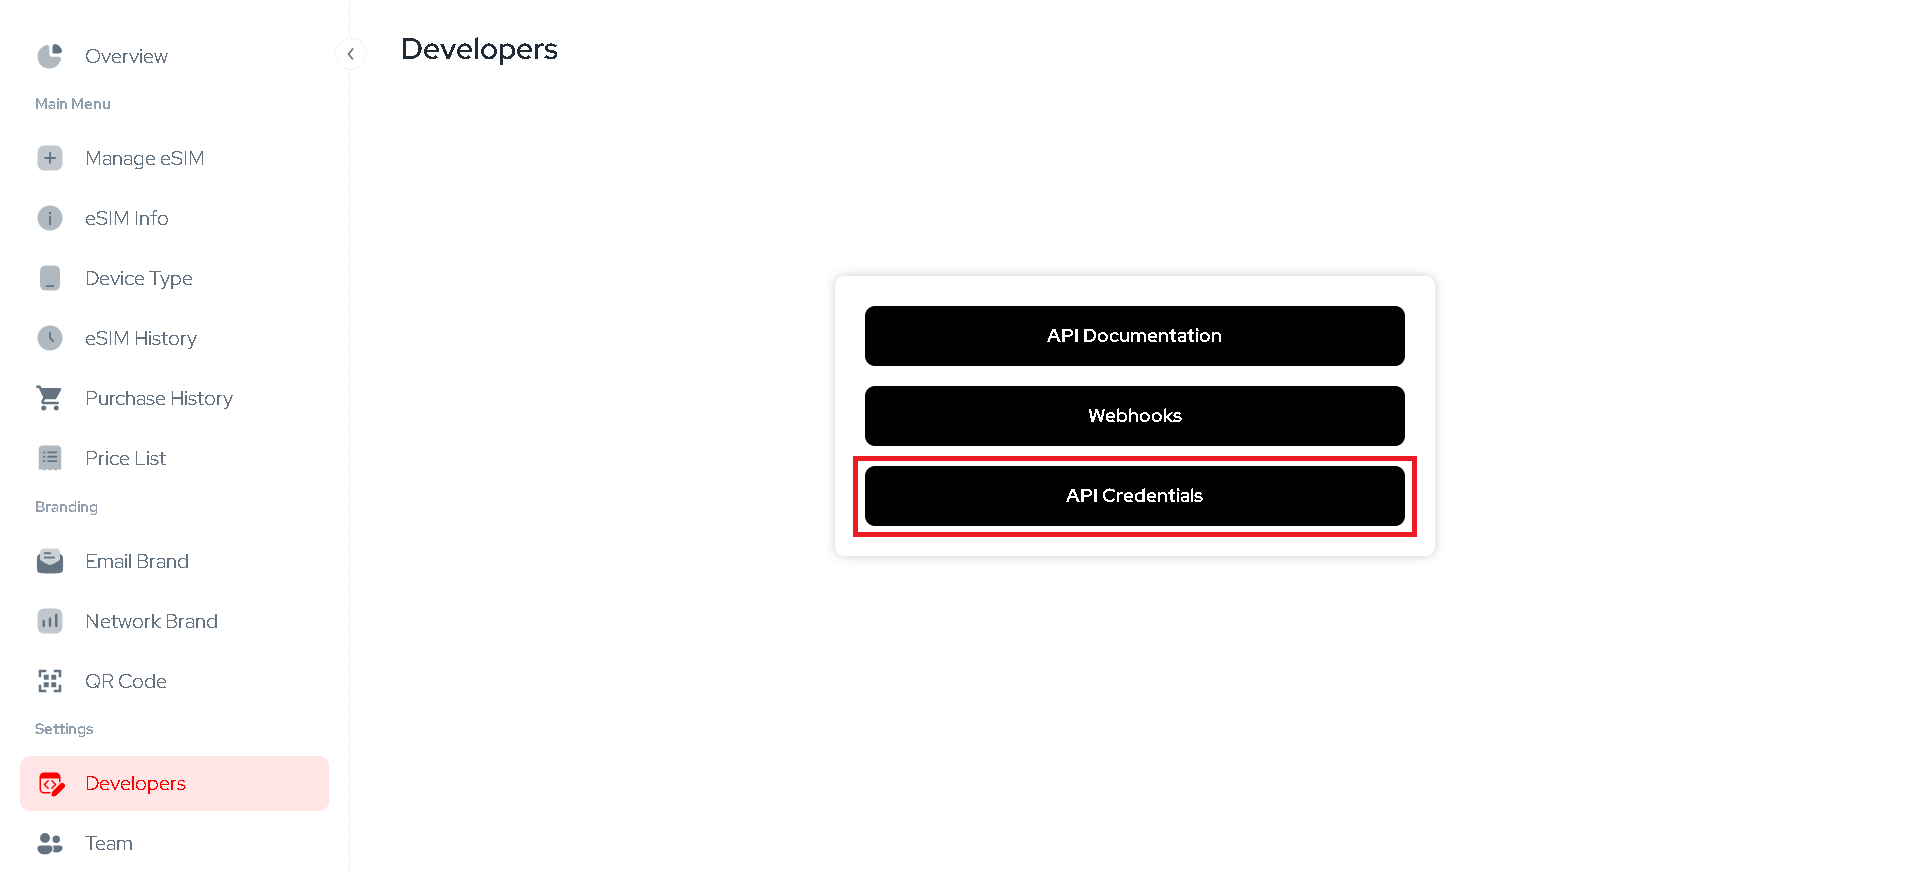
Step 1: Get Your API Credentials
- Log in to the CELITECH Dashboard
- Navigate to the Developers section in the left sidebar
- Click on API Credentials
- Copy your Client ID and Client Secret
Never expose your Client ID or Client Secret in frontend code, public repositories, or client-side applications. Always use them server-side and store them securely using environment variables or a secrets management tool (e.g., AWS Secrets Manager, Azure Key Vault).
Step 2: Install the SDK
Choose your preferred language and install the CELITECH SDK:
- JavaScript
- TypeScript
- PHP
- Java
- Go
- Python
- C#
npm install celitech-sdk
or
yarn add celitech-sdk
npm install celitech-sdk
or
yarn add celitech-sdk
composer require celitech-sdk/sdk
If you use Maven, place the following within the dependency tag in your pom.xml file:
<dependency>
    <groupId>io.github.celitech</groupId>
    <artifactId>celitech-sdk</artifactId>
    <version>0.x.y</version>
</dependency>
If you use Gradle, paste the next line inside the dependencies block of your build.gradle file:
implementation group: io.github.celitech, name: celitech-sdk, version: 0.x.y
If you use JAR files, package the SDK by running the following command:
mvn compile assembly:single
Then, add the JAR file to your project's classpath.
go get celitech
pip install celitech-sdk
If you are using Python 3, you can use pip3 instead:
pip3 install celitech-sdk
dotnet add package Celitech.SDK
Step 3: Make Your First Purchase
Now let's purchase an eSIM data package. The SDK handles authentication automatically using your credentials.
Understanding the Purchase Request
When creating a purchase, you need to specify:
- destination: ISO country code (ISO2 or ISO3) where the eSIM will be used (e.g.,
"FRA"for France) - dataLimitInGB: Amount of data in gigabytes (e.g.,
1for 1GB) - startDate: When the package becomes active (format:
YYYY-MM-DD) - endDate: When the package expires (format:
YYYY-MM-DD, max 90 days from start) - quantity: Number of eSIMs to purchase (minimum 1)
Example Code
- JavaScript
- TypeScript
- PHP
- Java
- Go
- Python
- C#
import { Celitech } from 'celitech-sdk';

(async () => {
  const celitech = new Celitech({
    clientId: 'CLIENT_ID',
    clientSecret: 'CLIENT_SECRET',
  });

  const createPurchaseV2Request = {
    destination: 'FRA',
    dataLimitInGb: 1,
    startDate: '2023-11-01',
    endDate: '2023-11-20',
    quantity: 1,
  };

  const { data } = await celitech.purchases.createPurchaseV2(createPurchaseV2Request);

  console.log(data);
})();
import { Celitech, CreatePurchaseV2Request } from 'celitech-sdk';

(async () => {
  const celitech = new Celitech({
    clientId: 'CLIENT_ID',
    clientSecret: 'CLIENT_SECRET',
  });

  const createPurchaseV2Request: CreatePurchaseV2Request = {
    destination: 'FRA',
    dataLimitInGb: 1,
    startDate: '2023-11-01',
    endDate: '2023-11-20',
    quantity: 1,
  };

  const { data } = await celitech.purchases.createPurchaseV2(createPurchaseV2Request);

  console.log(data);
})();
use Celitech\Client;
use Celitech\Models\CreatePurchaseV2Request;

$sdk = new Client(clientId: 'CLIENT_ID', clientSecret: 'CLIENT_SECRET');

$input = new Models\CreatePurchaseV2Request(
  destination: "FRA",
  dataLimitInGb: 1,
  startDate: "2023-11-01",
  endDate: "2023-11-20",
  quantity: 1
);

$response = $sdk->purchases->createPurchaseV2(
  input: $input
);

print_r($response);
import io.github.celitech.celitechsdk.Celitech;
import io.github.celitech.celitechsdk.config.CelitechConfig;
import io.github.celitech.celitechsdk.models.CreatePurchaseV2OkResponse;
import io.github.celitech.celitechsdk.models.CreatePurchaseV2Request;
import java.util.List;

public class Main {

  public static void main(String[] args) {
    CelitechConfig config = CelitechConfig.builder()
        .clientId("CLIENT_ID")
        .clientSecret("CLIENT_SECRET")
        .build();

    Celitech celitech = new Celitech(config);

    CreatePurchaseV2Request createPurchaseV2Request = CreatePurchaseV2Request.builder()
        .destination("FRA")
        .dataLimitInGb(1D)
        .startDate("2023-11-01")
        .endDate("2023-11-20")
        .quantity(1D)
        .build();

    List<CreatePurchaseV2OkResponse> response = celitech.purchases.createPurchaseV2(createPurchaseV2Request);

    System.out.println(response);
  }
}
import (
  "fmt"
  "encoding/json"
  "context"
  "github.com/Celitech/CelitechSDKGo/pkg/celitechconfig"
  "github.com/Celitech/CelitechSDKGo/pkg/celitech"
  "github.com/Celitech/CelitechSDKGo/pkg/util"
  "github.com/Celitech/CelitechSDKGo/pkg/purchases"
)

config := celitechconfig.NewConfig()
config.SetClientId("CLIENT_ID")
config.SetClientSecret("CLIENT_SECRET")
client := celitech.NewCelitech(config)

request := purchases.CreatePurchaseV2Request{
  Destination: util.ToPointer("FRA"),
  DataLimitInGb: util.ToPointer(float64(1)),
  StartDate: util.ToPointer("2023-11-01"),
  EndDate: util.ToPointer("2023-11-20"),
  Quantity: util.ToPointer(float64(1)),
}

response, err := client.Purchases.CreatePurchaseV2(context.Background(), request)
if err != nil {
  panic(err)
}

fmt.Println(response)
from celitech import Celitech
from celitech.models import CreatePurchaseV2Request

sdk = Celitech(
    client_id="CLIENT_ID",
    client_secret="CLIENT_SECRET"
)

request_body = CreatePurchaseV2Request(
    destination="FRA",
    data_limit_in_gb=1,
    start_date="2023-11-01",
    end_date="2023-11-20",
    quantity=1
)

result = sdk.purchases.create_purchase_v2(request_body=request_body)

print(result)
using Celitech.SDK;
using Celitech.SDK.Config;
using Celitech.SDK.Models;

var config = new CelitechConfig{
    ClientId = "CLIENT_ID",
	ClientSecret = "CLIENT_SECRET"
};

var client = new CelitechClient(config);

var input = new CreatePurchaseV2Request("FRA", 1, "2023-11-01", "2023-11-20", 1);

var response = await client.Purchases.CreatePurchaseV2Async(input);

Console.WriteLine(response);
Understanding the Response
A successful purchase returns an array with essential information:
[
  {
    "purchase": {
      "id": "1b97b67a-f4ea-45ff-bbc1-8f424b1418c4",
      "packageId": "6cf19d46-b545-4029-a46b-cdeba22b6957",
      "createdDate": "2023-10-20T00:00:00+00:00"
    },
    "profile": {
      "iccid": "1111222233334444555000",
      "activationCode": "LPA:1$CELITECH.IDEMIA.IO$AAAAA-BBBBB-CCCCC-DDDDD",
      "manualActivationCode": "LPA:1$CELITECH.IDEMIA.IO$AAAAA-BBBBB-CCCCC-DDDDD",
      "iosActivationLink": "https://esimsetup.apple.com/esim_qrcode_provisioning?carddata=LPA:1$CELITECH.IDEMIA.IO$AAAAA-BBBBB-CCCCC-DDDDD",
      "androidActivationLink": "https://esimsetup.android.com/esim_qrcode_provisioning?carddata=LPA:1$CELITECH.IDEMIA.IO$AAAAA-BBBBB-CCCCC-DDDDD"
    }
  }
]
- purchase.id: Unique identifier for the purchase
- purchase.packageId: ID of the package purchased
- purchase.createdDate: Creation date of the purchase
- profile.iccid: Integrated Circuit Card Identifier (unique eSIM number)
- profile.activationCode: QR code data as base64 for installing the eSIM on a device
- profile.manualActivationCode: Manual activation code for the eSIM
- profile.iosActivationLink: iOS activation Link of the eSIM
- profile.androidActivationLink: Android activation Link of the eSIM
Step 4: Activate the eSIM
The activationCode from the purchase response is a base64-encoded PNG image. Use this to generate a QR code that users can scan to install the eSIM on their device.
Once you have generated the QR code, follow the installation guide for your device:
- Android Installation Guide - Step-by-step instructions for Android devices
- iPhone Installation Guide - Step-by-step instructions for iPhone devices
If you included an email parameter in the purchase request, the QR code and installation instructions are automatically sent to the user's email.
Use our Postman Collection to test API endpoints without writing code, or explore the full API Reference for all available endpoints.
Next Steps
Now that you've made your first purchase, explore more features:
- List Destinations - View all available countries and regions
- List Packages - Browse data packages by destination and date
- Top-up eSIM - Add more data to existing eSIMs
- Get eSIM Status - Check usage and status