MCP (Beta)
The CELITECH MCP integration connects your CELITECH account to AI assistants like Claude and ChatGPT, and AI-powered editors like VSCode and Cursor — so they can create and manage eSIMs, check usage, and answer questions using live data from your account, right inside the conversation.
How It Works
MCP (Model Context Protocol) is an open standard that lets AI assistants securely call external services on your behalf. CELITECH exposes its eSIM platform as an MCP server, so any MCP-compatible assistant can connect to it directly — no custom integration code required.
Connecting works the same way everywhere: you give your assistant CELITECH's MCP server URL, and it walks you through a standard sign-in and authorization screen. Any team member with a CELITECH login can connect their own assistant — admin access isn't required. This is handy on plans where an admin adds the connector once for the whole team (e.g. a Claude Team workspace): each teammate then just signs in and authorizes individually to activate it for themselves.
Once connected, an assistant can act on behalf of the whole account:
- Purchase eSIMs on your behalf through your AI assistant
- Top up any eSIM with additional data
- Edit eSIM package dates
- View usage and details for every eSIM
- Manage your organization's eSIM inventory
Every assistant or tool you connect — Claude, ChatGPT, Cursor, VS Code, or anything else — gets its own independent connection. Connecting a second tool never affects the first: each keeps working until it's individually disconnected. See Managing Your Connections below for how to view and disconnect them.
Setting Up
Connecting is a one-time task per assistant or tool. The CELITECH MCP server URL is:
https://mcp.celitech.ai
Add it as a custom or remote MCP server in whichever tool you're using, then follow the on-screen prompts to authorize — see Authorizing CELITECH below for what that screen looks like.
Claude (claude.ai and Claude Desktop)
Claude Desktop shares the same account-linked connectors as claude.ai, so there's no local config file to edit. Setup differs slightly depending on whether you're on a Team/Enterprise workspace or a personal plan.
On a Team or Enterprise workspace, only an Owner (or sub-owner) needs to add the connector — once it's added at the organization level, every member sees it automatically, with nothing for them to configure.
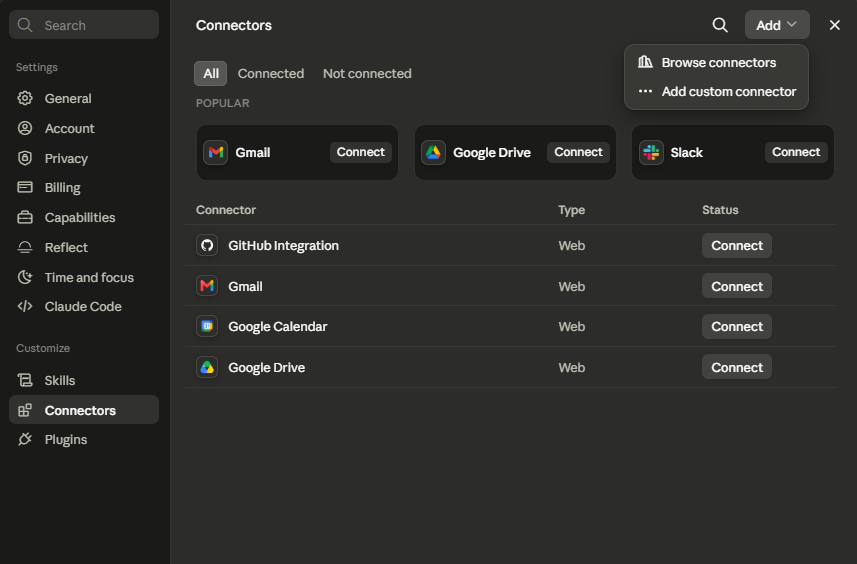
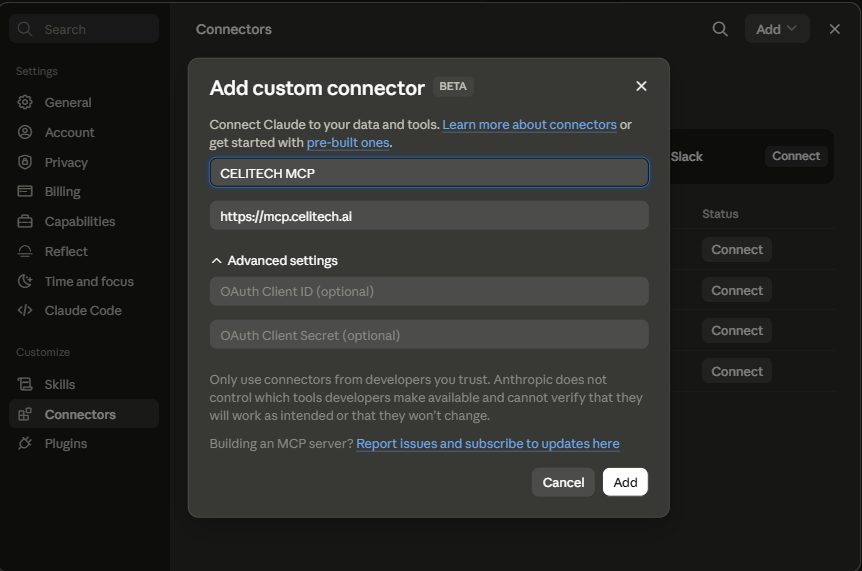
1. Add the connector (Owner/sub-owner only). Go to Organization Settings → Connectors and click Add custom connector. Paste the server URL above, give it a name (e.g. "CELITECH"), and save. Leave the Client ID and Client Secret fields blank — CELITECH registers Claude automatically.
2. Everyone else just connects. Once it's added, CELITECH shows up automatically in every member's own Settings → Connectors list. Each person clicks Connect and signs in with their own CELITECH login — continue with Authorizing CELITECH.
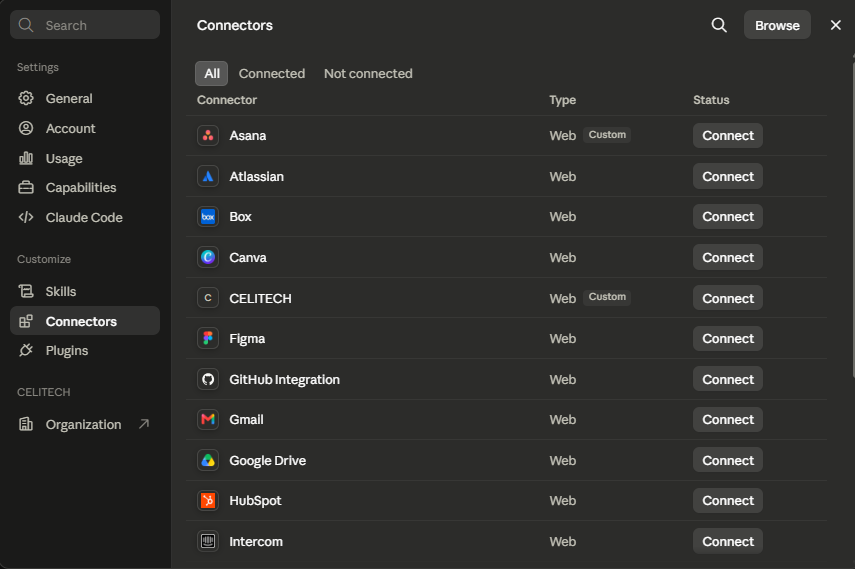
On a Free, Pro, or Max plan, there's no organization to add it for — you add and connect it yourself, following the same two steps above under your own Settings → Connectors.
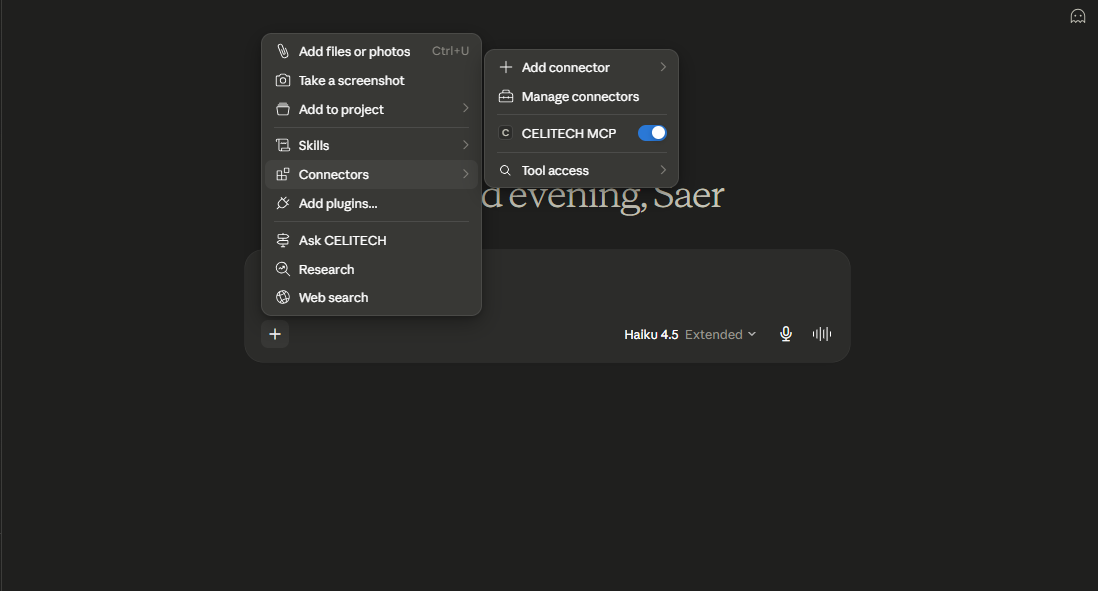
3. Enable it in a conversation. Click the + button next to the message box, open Connectors, and toggle CELITECH on.
Custom connectors are available on every plan. The Free plan is limited to one custom connector.
ChatGPT
Custom connectors require Developer mode, which is off by default and isn't available on the Free plan.
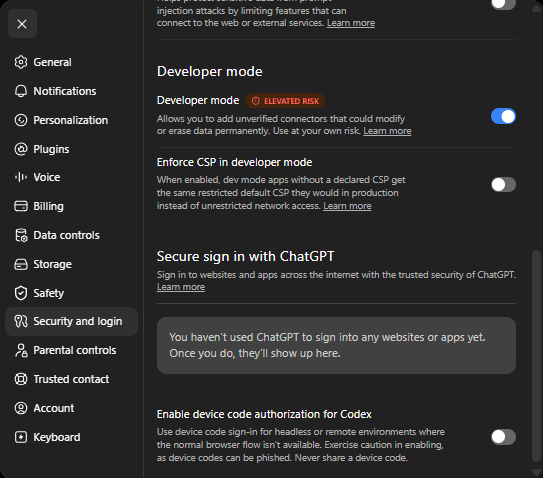
1. Enable Developer mode. Go to Settings → Apps → Advanced Settings and turn on Developer mode. On a Business, Enterprise, or Edu workspace, an admin must first enable this for the workspace before members can turn it on individually.
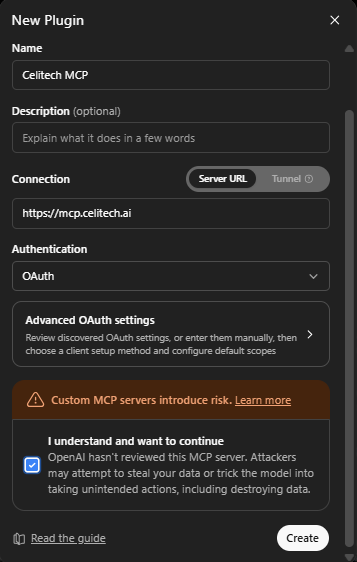
2. Add the server. Go to Settings → Apps, click Create, and fill in a name (e.g. "CELITECH"), a description, and the MCP server URL above.
3. Scan and authorize. Click Scan Tools. ChatGPT opens CELITECH's sign-in and authorization page — continue with Authorizing CELITECH. Once approved, click Create to save the connector.
On Business, Enterprise, and Edu workspaces, custom connectors get full read and write access. On individual Plus and Pro plans, custom connectors are currently limited to read-only tools — actions like purchasing or topping up an eSIM won't be available.
VSCode
VSCode's MCP support requires GitHub Copilot to be enabled (the free tier is enough).
1. Add the server. Open the Command Palette (Ctrl/Cmd+Shift+P) and run MCP: Add Server. Choose HTTP, paste the server URL above, name it "CELITECH", and pick Global or Workspace scope.
2. Authorize. VS Code detects that CELITECH requires sign-in and opens your browser automatically — continue with Authorizing CELITECH.
3. Use it. Open Copilot Chat, switch to Agent mode, and CELITECH's tools will be available alongside your others.
Prefer editing config directly? Add this to .vscode/mcp.json (workspace) or your user MCP configuration (global):
{
  "servers": {
    "celitech": {
      "type": "http",
      "url": "https://mcp.celitech.ai"
    }
  }
}
The first authorization attempt will fail — this is expected (Known issue). VSCode initially opens a redirect URL that tries to connect using a local address on your own machine, which will not succeed. When you see the connection error, stop that authentication attempt in VSCode and wait — VSCode will then suggest retrying with a different sign-in method. Accept that second attempt: it opens a different, correct redirect URL that will successfully connect the MCP.
Cursor
Cursor manages custom remote servers through a config file rather than a form.
1. Add the server. Create or edit ~/.cursor/mcp.json (global) or .cursor/mcp.json in your project, and add:
{
  "mcpServers": {
    "celitech": {
      "url": "https://mcp.celitech.ai"
    }
  }
}
2. Authorize. Save the file, then open the Customize panel in the sidebar — CELITECH should appear there. Selecting it opens your browser to sign in — continue with Authorizing CELITECH.
MCP requires a paid Cursor plan (Pro, Pro+, Ultra, Teams, or Enterprise) — it isn't available on the free Hobby plan.
Authorizing CELITECH
However you got here, the authorization step is the same for every tool:
1. Choose an account (only shown if you belong to more than one CELITECH account).
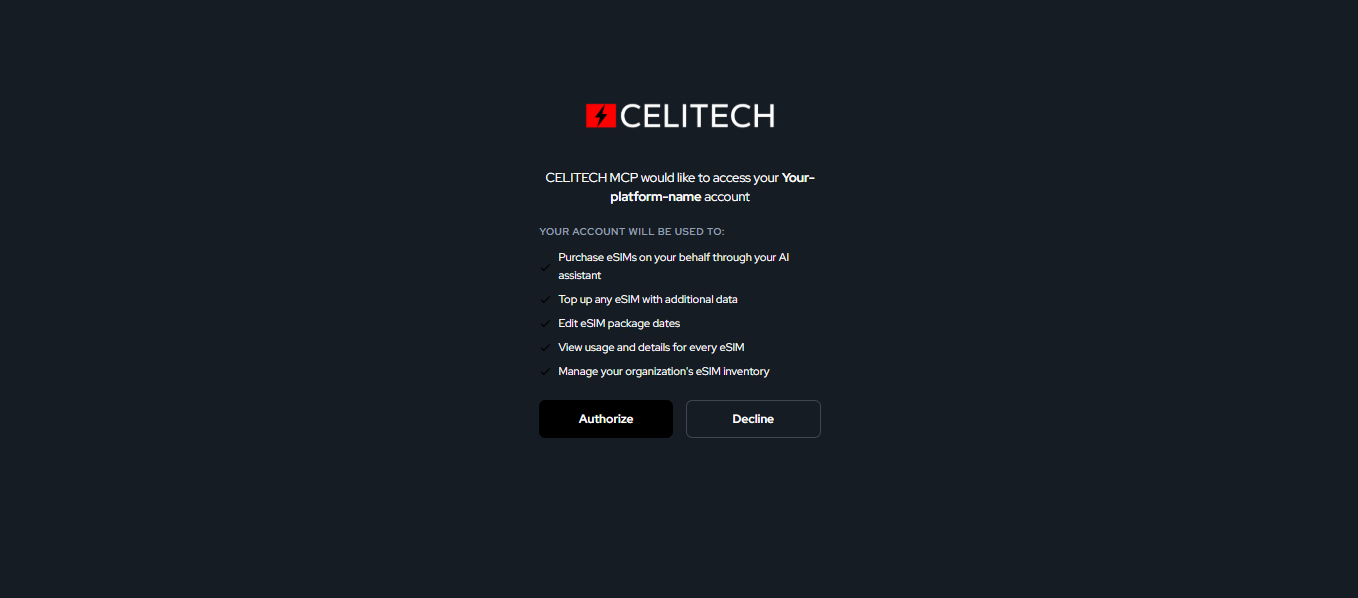
2. Review and authorize. CELITECH shows what it's about to grant access to — the same permissions listed under How It Works — plus Authorize and Decline buttons.
3. Done. Click Authorize, and you're redirected straight back to your assistant — connected.

If you click Decline instead, the connection is cancelled and nothing is linked — just close the window and return to your assistant.
Everyday Use
Once connected, just ask your assistant in plain language — no special syntax needed. For example: "Buy me a 5GB eSIM for Japan valid next week" or "How much data is left on ICCID 8988...?"
What Your Assistant Can Do
| Capability | What it does |
|---|---|
| Browse Destinations | List the countries and regions eSIM packages are available for |
| Browse Packages | Look up available data packages for a destination, filtered by size, dates, or duration |
| Purchase an eSIM | Buy a new eSIM — choose destination, data size, and validity dates or duration — and email activation details to a recipient |
| Top Up an eSIM | Add more data to an existing eSIM by its ICCID |
| Edit a Purchase | Change the start or end date of an existing purchase |
| Check Data Usage | Look up how much data has been used against a purchase's plan |
| View eSIM Details | Look up an eSIM's current status and details by ICCID |
| View eSIM History | See the activity history for a specific eSIM |
| View eSIM Device | See the device info such as hardware name, model, oem and eid from the installed eSIM |
| List Purchases | Search and filter your organization's purchase history by date, email, ICCID, or reference ID |
Managing Your Connections
Go to your CELITECH Dashboard → Developers → Connected Apps → MCP to see and manage every assistant connected to your account.
What you see there depends on your role:
- Everyone sees a My Connections tab — your own connections only.
- Admins additionally see a Platform tab — every connection across the whole account, for every team member.
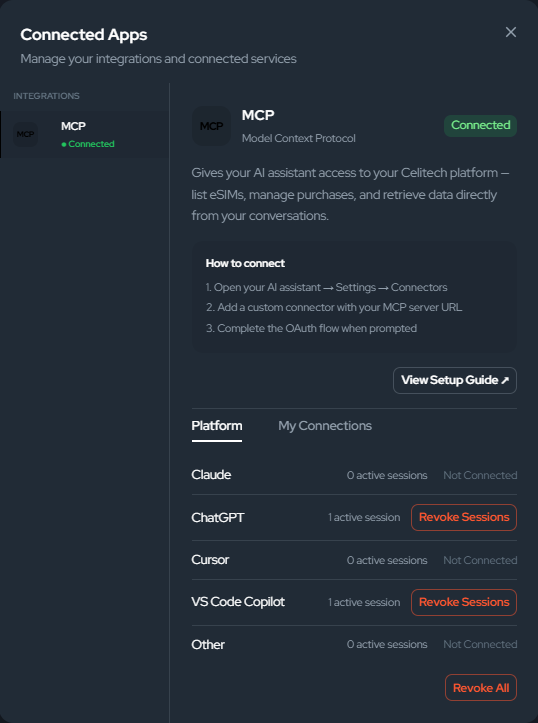
My Connections (everyone)
This tab lists the AI clients CELITECH recognizes — Claude, ChatGPT, Cursor, and VS Code Copilot — plus an Other row for anything that doesn't match one of those (e.g. a newer tool, or one that identifies itself differently than expected). Each row shows whether you personally have an active session on it. Only sessions tied to your own login show up here; you can't see or affect anyone else's from this tab.
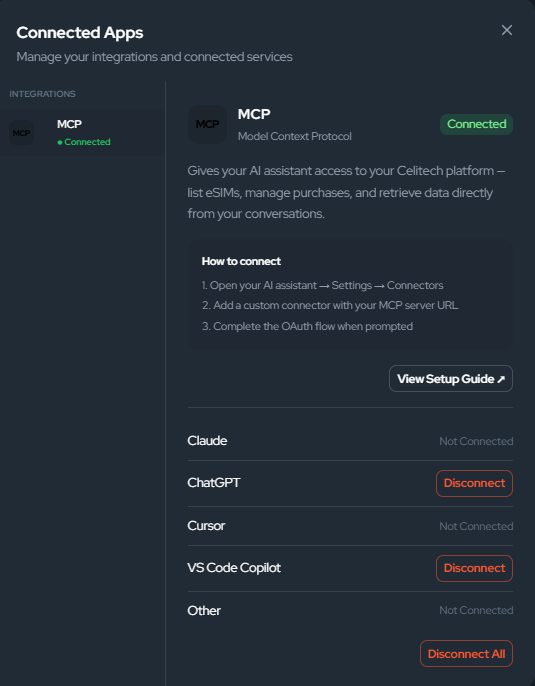
- Next to any assistant you're connected to, click Disconnect to end just that one session. The other assistants you have connected keep working.
- Click Disconnect All to end every session of your own at once, across every assistant. This button only appears once you have at least one active connection.
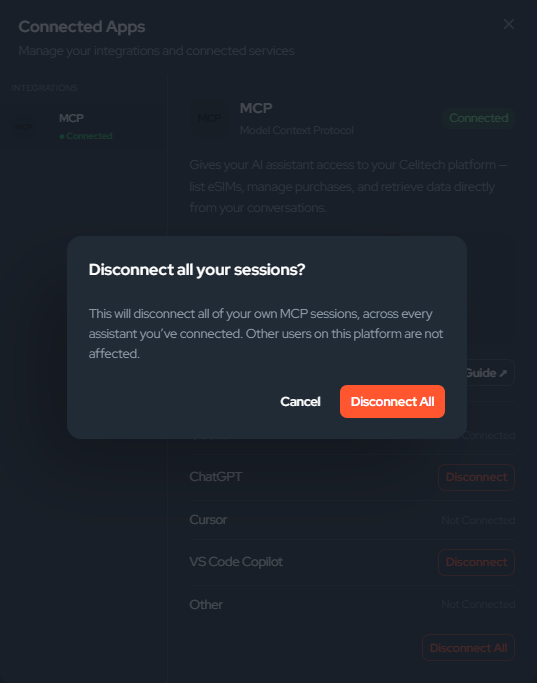
Disconnecting doesn't uninstall or remove anything from the assistant itself — it only revokes its access on CELITECH's side. The assistant will start returning an unauthorized/error response the next time it tries to use a tool, but it generally won't detect this on its own or prompt you to sign in again — in Claude, for example, the connector can keep showing as "Connected" in its own settings even though it no longer has real access.
To restore access, go into that assistant's own connector settings, disconnect CELITECH there, and reconnect — that's what actually triggers a fresh authorization flow. Simply waiting, or re-using the assistant, won't bring the connection back.
Platform (admins only)
This tab shows the same AI clients as My Connections, but aggregated across every team member who has connected — for example, "Claude — 3 active sessions" means three different people on your account currently have Claude connected, not just you.
Two actions here are broader in scope than anything on the My Connections tab, since they can affect other people's sessions, not just your own:
- Revoke Sessions next to an assistant ends everyone's session on that one assistant — every team member who connected via, say, ChatGPT gets disconnected, while Claude, Cursor, and any other assistants stay untouched. This button only appears while at least one session is active for that assistant.
- Revoke All is the broadest action available: it ends every active session, for every assistant, for every team member — and also fully disables MCP for the account itself. Unlike every other action on this page, someone will need to go through the authorization flow again afterward before MCP works again for anyone, even if they weren't affected by anything else. This button only appears while at least one session is active anywhere on the account.
Regular (non-admin) users can't see or trigger either of these — their access is limited to their own connections on the My Connections tab.
Reference
Compatible Platforms
- Claude (claude.ai & Desktop)
- ChatGPT
- VSCode (GitHub Copilot)
- Cursor
- Other MCP-compatible clients
Getting Help
Having trouble connecting, or want to check whether a specific platform is supported? Reach out to our team:
Email: devops@celitech.com